Top of Products > Solder-Aid > HIKARU'S DIARY ON LEARNING TO SOLDER > EPISODE 6: "Mr. Tanaka is a nice person"


I'm enjoying soldering now.
That's good. The trick for improving soldering skill is to enjoy it.
Mr. Tanaka, do you have anything I can make in addition to this?
Sure, you came all the way to my home anyway. Would you like to make another one?
I'd like to make something that makes Yotchan happy.
Hum, I wonder if I have anything appropriate.
How about this?
What is it?
Voice Changer.
*Voice Changer Kit
A kit that can freely raise or lower voice tone.
Yotchan will probably play with this kit. I'm going to make it now!
Oops! This case has no hole.
Really? Well, I'll prepare the hole and you can do the soldering.
Thank you.
You are a nice man, Mr. Tanaka. Well, let's start. Oops!
What?
One component has already been mounted.
Yes, this is called "surface mounting". (Photo 1)
Photo 1
I feel like I'm missing out because there aren't as many components to solder.
But, it is rather difficult to solder such a component with small lead pitches by using a soldering iron because a lead terminal may be bridged with the adjacent one. Maybe it is too difficult for you, Hikaru.
Do you think so?
First, I should solder the lower parts. Then, I bend the lead wires, insert them, and re-bend them. Then, I put the soldering tip and feed the solder. Pull the solder and then the soldering iron, from the joint. Um? This is a good job, isn't it?
Hikaru, you are doing well. You are maintaining a good rhythm which is important for soldering too. By the way, are you comfortable enough to solder with holding the soldering iron like that?
Why?
As long as you are comfortable, that is fine. I hold a soldering iron like a pencil (Photo 2). Some people hold a soldering iron with the whole grip. (Photo 3)
Probably, children or people with small hands can more easily use a soldering iron by holding it with the whole grip. I'm somewhat concerned about it because you seem to follow what I do.
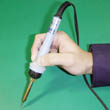
Photo 2
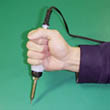
Photo 3
I can use the soldering iron more easily in this way too. By the way, what is this black component with three leads?
This is called the "transistor". (Photo 4) It can amplify an electric current or voltage, or serve as a switch.
Photo 4
It seems to be a somewhat complicated component.
Transistors in the past were easily affected by heat. They will break down if the internal temperature exceeds 80℃.
Really? They can't be soldered, can they?
They can, but there are some difficulties. When soldering a transistor, we must use a heat sink (Photo 5) or a radiator to prevent heat conduction from the soldering iron into the transistor. When a heat sink is not available, it should be pinched with tweezers.
But, since the currently available transistors have improved performance to withstand up to about 150℃, we rarely use a heat sink now.
Photo 5
It was bothersome to solder transistors in those days.
Will you use a heat sink if you are worried about it?
No, I will not use it. But, just let me see a heat sink.
Here you are. This is a heat sink. You had better use it if you are worried about it.
I think I will.
Hikaru, did you finish soldering?
Almost. I cut this lead with the nippers, and I finished. But, Mr. Tanaka, this kit does not include a speaker.
Well, then, you can use this.
Thank you. I solder these parts. That's all. Mr. Tanaka, please check the soldering condition.
Let me see. Hikaru, you are getting better at soldering quickly. Your job is better than before, but there is a slight variation in solder quantity.
What? Is this electrolytic capacitor mounted with reverse polarities? (Photo 6)
Wait a moment. R2 and R3, and R6 and R7 are mounted in the opposite positions.
Photo 6
No! Really?
We may easily make a mistake when we're getting used to soldering, as with everything.
In this case, how can I correct them? Or, is it too late ?
Don't worry. You can remove the solder using the desoldering braid and then remove and re-mount the components one by one.
Mr. Tanaka, how does the desoldering braid suck up solder?
The desoldering braid is stranded copper wire coated with flux. (Photo 7) When the desoldering wire is heated above solder, the solder melts and spreads over the desoldering wire. Then, the solder will be soaked up by capillarity. Capillarity is a phenomenon whereby liquid penetrates into a small gap, like water soaks into a towel.
Photo 7
I see. Well, then, let me try to remove solder.
····· Is this way right? Hmm, it is difficult to remove solder from this position. Hmmm.
If you forcefully pull or twist the solder, the pattern will come off the board. Even if solder seems to be removed, it may still remain. You may put the desoldering braid again, but a small quantity of solder remaining in the back of a through hole is difficult to remove. So, you should try to remove it again after re-soldering it once.
I think I did this right. But this time, I removed solder on the adjacent part too.
It seems fairly difficult. Repair work is more difficult than soldering. Just a moment, I'll get a more appropriate tool.
What is this?
SPPON.
HAKKO SPPON
SPPON? What can I do with this?
You can remove solder with this tool. It has a piston inside and the tube functions as a cylinder. Push the shaft into the cylinder until it clicks and press the button. "SPPON!" The piston is pushed back by spring force and the cylinder sucks air.


Can this tool really remove solder?
Look, I'll try once. Push the shaft into the cylinder and melt the solder at the part to be repaired. After the solder melts, put the suction port on the solder and press the button. "SPPON!" See, it could remove the solder.
Wow! Let me try it. Well, I push the shaft into the cylinder, melt the solder, and press the button. "SPPON!" What?! That didn't remove solder very well.
You pulled up the soldering iron too early, so the solder has solidified. Also, since there is no clearance between the board and the suction port, air does not flow into the cylinder. Tilt the "SPPON" slightly or raise the suction port from the board to make a space between the board and the suction port. (Photo 8) Then, pull the soldering iron at the same time as you press the button or do not pull it until the solder is completely remove.
Photo 8
I see. Let's try again. I push the shaft into the cylinder, melt the solder, and press the button. SPPON! Wow, that removed solder well. I want to do this again!
This is rather fun. SPPON! SPPON! SPPON! SPPON!
Oops! You did not need to remove solder from that part!
Oh! I've happened to remove the solder from an OK part!
Phew
Well, then, I'll re-mount the removed components and solder them correctly. Rework is difficult because the lead wires are short.
Done!
After removing solder, you should make sure other soldered parts were not removed and the leads are not short-circuited with solder balls.
Well, let me see? It's OK. Now, I'll try to operate it. Connect the battery and turn ON the switch.
Wow! It works well, Mr. Tanaka!
Completed! (Speaker is not included in the kit)
That's good. Now, shall we put them away?
Yes. Mr. Tanaka, you are very nice to have worked with me.
No, it was nothing.
Mr. Tanaka, thank you very much for today. I'm much more interested in soldering now.
That's good.
I'll see you later, Mr. Tanaka.
Hey, wait a moment.
What?
The speaker and my instruction are free. But, I'll charge you for the Dice kit and the Voice Changer. (Laughing)
What? They are not free?
I said that the speaker and my instruction are free.
Oh dear…