Lineup
Soldering Iron/Ceramic Heater Type

Available in:
| 1. |
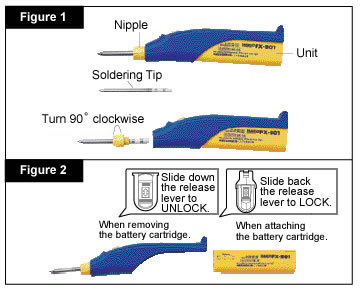
INITIAL SET UPPut the soldering tip through the hole in the nipple, then insert them to the unit as shown in Figure 1. Turn the nipple approximately 90 degrees clockwise and screw it tightly on the unit. Be sure to secure the tip tightly. Attach the soldering tip while it is cold. |
|---|---|
| 2. |
INSERTING THE BATTERIESSlide down the release lever to the UNLOCK position as shown in Figure 2. Remove the battery cartridge from the unit. Check the polarity and insert the batteries in the proper orientation.Place the upper side of the battery cartridge onto the guide of the unit, slide the cartridge, and set the release lever to the LOCK position. |
| 3. |
HOW TO SOLDERTurn the power switch ON. The LED lamp lights up, and the soldering tip heats up to be soldered after 40 seconds.After soldering, be sure to turn the power switch OFF and attach the protective cap to the unit. |